Siberian Elm #5 Urban Yamadori
March 17, 2019. The elm (#4) came out pretty easy. I figured I could take out this one that I had hoped was a clump, which never seems to be the case with these elms. This one I had cut back to about 3" last summer. The digging was good aside from having to sidestep some dog shit...well, it is waste site along a random road.
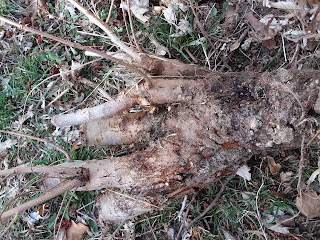
This one had some lateral roots, so I was hopeful that it would have enough to sustain it. There were however, little to no feeder roots. I tossed it in the bin with the other one, filled in my holes and made the 3 block drive home.
This tree has some root spread, but it was well beneath the soil line. The challenge of this tree was the thin waist that led to a section that got thicker as multiple branches suckered from the ground level. Before digging, I thought this one would be a clump, I have thought this before, and I was wrong again. The challenge, and theme of these S. Elms is the reverse taper.
I looked at my options for a while and thought about keeping the heavier trunk while removing the center trunk and the two thinner ones that are in the upper part of the following image. I decided to take a bolder approach that would leave me with some thinner trunk-line options. Also, the thinner two trunks have some movement, as opposed to the thicker part which was straight after a slight initial bend of the main trunk.
Here is the opposite side, and I started to second guess myself when I was 1/2 way through sawing. Anyway, I was committed!
The growth rings show how fast these trees bulk up. It looks like just a few years of growth.
The wound is large, but I feel it was the correct choice. There is plenty of wood to work with when it comes time to do any carving.
One of the large roots got split when I was extracting it from the ground. I used some electrical tape inside-out to hold it together. Maybe it will fuse and heal up.
Here is that large cut from the top, sealed up. I decided to leave the other two uncut, as those wound are a year old already. I want to try to preserve some moisture in the tree, which is more or less a large cutting. The root spread could be promising. Hopefully, there is enough energy in the tree to push growth in the upcoming weeks.
Here is one front option, currently the preferred one. The left-hand side would be carved to create taper and visual interest.
This is an interesting option too, but shows the bulge, and the future need for carving.
June 5, 2019
Cleaned out some unnecessary growth, but did not reduce any branches. I will let this run wild this year to thicken branches, and will make some decisions next growing season.
Below the tree can be seen as more 3D and I left branches to fill the spaces and maximize light.
End of July
The bench was really overgrown, so I did some trimming (to approx 3 sets of leaves) and wired most branches to establish initial movement.
End of August 2019
The tree filled out and I brought it to the bonsai show to do some light work.
I got home and broke out the dremel with the weasel bit. I will do a bit more work on it next spring. I was inspired and ordered some heaver carving tools.
Here it is from two angles. I painted it with 100% lime-sulfur with black acrylic ink mixed in. Not bad for one growing season!
Well, the die grinder came in the mail along with the terrier bit from England. It make quick work of deepening this hollow and cleaning up the back side too.


No comments:
Post a Comment